The updated advance rule donut will allow the creation, edit, audit and delete of Advance rules, business hours rules and after hours rules. One of it's key new features is the ability to create unconditional forwarding rules very easily. Lets get started on the basics of the tool.
Go to http://advanced-rules.ps.ringcentral.com
Start by putting the in the UID and once it loads click the Filter button.
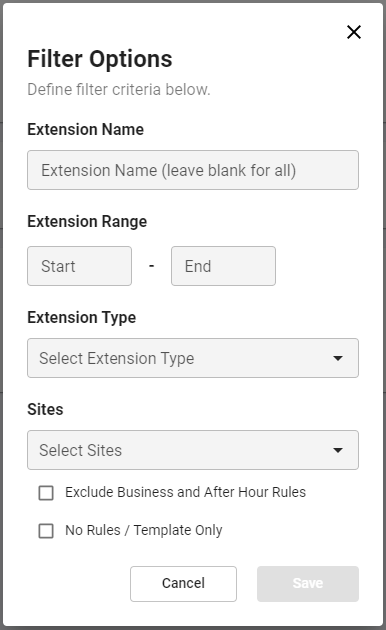
You can filter by all sorts of options, but the one filter you will mostly likely always want to check is the "Exclude Business and After Hour Rules" This is because those rules are default on all extensions and you most people want to only see custom rules.
You can filter by rules that have a specific name, a range of extensions, a site and by extension type. Extension types are User, Call Queue, Announcement, Digital User, Fax User and Virtual User.
The option to just download the template can be useful if you are just making 24/7 unconditional forwarding rules and don't care to see any existing rules.

Once you have set your filters by clicking save you will see the filters listed.
If you click the download without setting any filter you will get all rules on the account and the more extensions on the account the longer this will take to download.
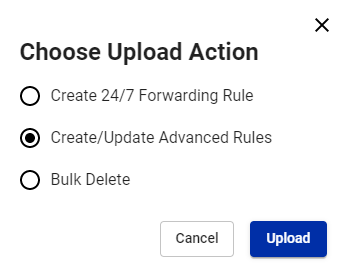
The download will consist of a spreadsheet with 3 tabs.

- Existing Rules - This tab is where you can change existing rules or create new ones (Create/Update Advance Rules). This is the most advance option, but also gives you all the details and some details form this tab are required to delete rules.
- 24-7 Forwarding - This tab is for creating unconditional forwarding rules to a phone number. You have 3 columns of data here, but you only need the extension and the forwarding number. If left blank the rule name will be auto generated based on the extension and phone number. Cloud Connects are working via the platform API and it will accept the format +11 IE: 1113033334444
- Bulk Delete - In order to delete a rule you need to know the Rule ID and The Extension ID, both of those values are available from the downloaded details found on the Existing Rules tab.
Once you have made the modifications to the spread sheet tab you can upload the file. Upon the 2nd step of the file upload you will get the option to choose an action. This action directly relates to each tab of the spreadsheet.
The tool will then being the work you have uploaded. The tool will display a status bar and will provide any feed back about any errors that occur as it sends API calls to RC platform to preform the work.
Primary contact for support on this tool is Trevor Kelson, if he is not available please reach out to the Professional Services Development Team. Enjoy the DOUNT!